DevLog #1 - Placement Year
- Patrick Sharpe
- Jun 1, 2023
- 9 min read
Updated: Jun 12, 2023
Introduction
Today in this DevLog, I will give some insight into the type of work I developed for projects during my placement year. This consisted of discussing the project, how long it took to create, what tools and software were used, reasons for carrying out work and what changes were made for each project.
Freelance Project
I started my placement year by working freelance at the start of September as I found an opportunity to work on an Interactive project alongside a small team at Ulster University's Screen Academy using Dome Projection.


What is the Project?
The project was focused on exploring new ways of storytelling using a mixture of mediums such as video, audio and sensory. The project is centred around a young audience that would engage and interact with the story. Using digital environments in the dome allows the storyteller to control where the audience focuses towards.
Project Client

Vicky McFarland is the project's client and owns a local independent company called Tale Time.
Vicky is a writer, teacher and storyteller who handcrafts stories that connect to children and adults.
She creates engaging storytelling experiences all across Northern Ireland.
Client Needs
Engaging and Interactive Experience
Ability to control scenes with the use of a Remote Clicker
Be able to have scenes looped when needed
Client Wants
Scene Transitions
VFX Customisation
Sound and Music Effects
Project Scope
The project's scope was kept to be minimum as possible so that any new changes wouldn't remove a lot of progress.
Goals
Meet client needs
Reach project milestones
Keep track of deadlines
Deliverables
Aim to deliver Scene Functionality
Aim to iterate scenes from client feedback
Aim to satisfy client's wants
Tasks
Develop scenes from the story
Integrate control functionality to scenes being implemented
Test scenes for input from the client
Costs
The project was funded by Arts Council NI and Future Screens NI which has covered the costs of the project's development.
Deadlines
The initial project timeframe reached around twelve weeks from September 7th, 2022 to December 13th, 2022 but was later extended to have another four weeks of final development during January 2023.
Required Software and Tools
Unreal Engine – Game Engine used to develop the project
GitHub – Project's Source control to collaborate with the team
Adobe XD – Creating storyboard scenes using scrum meeting concepts
Adobe After Effects – Renders image sequences into a video format
Amateras Player – Simulates video or image sequences inside a Dome
Audacity – Edit sounds or music to make them loopable or shorter
Photoshop - Created concept art before developing scenes in Unreal


Project Pipelines


Production Project Roles
I took on quite a few roles within the project's production, which enlightened me about what role I'd enjoy working on the most in the future. Here are the main roles I was a part of:
Programmer Role
As a Programmer in the project, I developed blueprints that would allow Vicky to control scenes using a clicker. This allowed her to change to the next/previous scene, or restart/loop the current scene. The blueprint also allowed Vicky to control values in VFX systems and materials in real time.


I also was in charge of installing plugins which included:
Camera 360 V2
Character, Environment and Material Asset Packs
VFX Systems
Insect System
I had no prior knowledge of using these plugins so it was great to learn how to use them for this project and future projects. I also created my materials for landscaping and clouds to help with the look and feel of the scenes being made.
Lastly, I was working on implementing jpeg sequence constellations using Img Media Source to obtain the image sequences and Media Player to render and create a material to play in sequencer for the night sky scenes.


Level Designer Role
As a Level Designer in the project, I collaborated with another team member, and it was a great experience sharing ideas and feedback. I progressed from developing interior blockouts to learning how to use landscaping tools for more natural exterior environments and then added lighting and assets to scenes.


I moved on to creating sequences within each assigned level around the block-out area that had me position the camera while making characters and assets move over and around the camera. The client liked the scenes that were being made but preferred more scenes to be loopable so I started focusing on making scenes loopable such as:


I also started working on some transitional scenes to help with blending looped scenes. Although the majority of these scenes weren't added to the final product as they were either unnecessary or poorly received.


Sound Manager
As a Sound Manager in the project, I managed and edited sounds or music in the project. I used free online sources or sounds made by the sound designer. These sounds and music tracks would be used when necessary to fill gaps between scenes.


Task Manager
As a Task Manager in the project, my role was to add and manage tasks from discussions at group meetings and from client feedback onto Trello, it allowed the team to focus on one task at a time and to aim for milestones of the project.


Miscellaneous Roles
There were a few other roles that I was a part of which was setting up the project by using Github as its source control. I set up a repository to manage the project by making sure everyone installed the correct plugins and software to run the project. I also helped set up the dome during testing sessions where we would use VLC to run the recorded scenes and then with the mirror projector, it would reflect against a semi-sphere mirror to project outwards across the entire dome. However, the quality of the mirror projection wasn't amazing but it was working. During the testing of scenes, it would allow me to detect any visual bugs or missing assets in the scene and fix them during working hours. These roles were important to help stabilise the project pushed the team to reach goals.
Personal Project
At the start of February, I decided to work on a game prototype as my project since It's been a long time from making a game prototype on my own. I found that it would be more beneficial to work on a personal project that I'm interested in to grow my game development skills than to spend time trying to look for more freelancing opportunities.
What is the Game Prototype?
The Game Prototype is a Mobile turn-based survival game that is set in a post-apocalyptic zombie infestation world where you as the player have to face off against the dead and the damned which can be challenging but also rewarding. To survive each level, the player has to strategise each move and use combat to take down nearby enemies without a trace or blast your way out of the surrounding enemies. Either way, you'll need to scavenge for ammo, items and keys to stay alive.
Target Audience
The game prototype is set to have a mature audience that enjoys zombie gore survival games with some puzzle and strategy elements.
Project Scope
The project scope had to be very small since it was only myself working on the project and in that case, I did have to compromise with downscaling the project with certain mechanics or levels not being made due to time constraints. I also had to buy asset packs to avoid adding development time to creating my assets.
Goals
To make the game challenging and engaging for the player
To make the player feel that they have earned rewards
To make the game enjoyable and replayable
Deliverables
Aim to create exciting mechanics
Aim to develop and test levels
Aim to iterate on UI when presented with feedback
Tasks
Develop remaining Game Mechanics
Block out levels designed in pre-production
Implement interactable mobile UI into the project
Costs
At the moment, there have been only asset costs to the project which I did wait before the project started for a sale discount. I thankfully bought them all to total around £43.80. Here are links to the asset packs:
Deadlines
The initial deadline for finishing the project was roughly the first week of June 2023 just in time for making this dev log. However, after listening to positive feedback towards the game from the placement presentation at the end of April. I decided to push the project deadline date to the second week of July due to wanting to fix inefficient scripting as well as develop levels and implement interactive UI features.
Required Software and Tools
Unreal Engine 5 - Game Engine used to develop the project
GitHub – Project's source control for securing the project online
Adobe XD – Creating designs and prototypes from concepts
Project Pipelines
Project Roles
There's been a few roles within the project that has allowed me to improve upon my knowledge of Unreal Engine 5, Here are the roles I contributed so far:
Game Designer Role
As a Game Designer in the project, I was to generate ideas and develop game concepts. I first had to look online and research the type of game I was trying to make and I came across Hitman GO and Zombie GO which were two games that inspired me to make a top-down puzzle game but I wanted to focus more on zombie survival so there might be some puzzle areas that require the player to strategise. I moved all of the ideas and concepts to Miro as I found them more accessible.


Level Designer Role
As a Level Designer in the project, I was to concept and design levels. During the weeks in pre-production, I created:
Concepts


Design Progress
I first created simple key icons for building levels and then progressed with making paths and adding colour to the level plane.


Finished Designs
So far I have designed around 5 levels but I do have another 5 levels in mind if I plan on making them.


UI Designer Role
As a UI Designer in the project, my role was to create concepts and develop testing prototypes before implementing them into the project. During the weeks in pre-production, I created:
Concepts
I created a flowchart to determine how the UI would work, providing each colour to represent buttons, information, game effects, booleans and levels. This factored into how I developed my designs.


Designs
Here are some of the UI designs that I came up with using inspiration from TFT Mobile and Hitman GO. I wanted to make the designs of the UI to be simple and big enough to press. I used a combination of circles and rounded rectangle shapes for buttons. The UI is currently in black and white but the colour will be added once UI is implemented.


Prototype
I wanted to present a working prototype that you can try out and let me know what you think of the experience and what can be improved upon. You can also see a few gifs of the prototype working.
Adobe XD Prototype link:
Programmer Role
As a Programmer in the project, I developed concepts made in pre-production. During five weeks of production, I created:
Player Character
I created a blueprint for the Player Character for setting up components, events, and functions to use across the project. Here are some examples:


Blueprint Interfaces
I used this type of blueprint for the player character to access interactable blueprints without casting such as:


Gifs
Here are a few gifs on testing melee weapons, swapping weapons and throwing projectiles.
Turn-Based Grid Movement
I created a grid blueprint to control the movement of the player to how I wanted it to be. I used a tutorial to help create the blueprint as it was a big learning curve to make it on my own but it allowed me to understand the process of making the blueprint and iterate it to fix any underlying issues.


Animation Blueprint
I created an animation blueprint to control animations for the player character which includes:


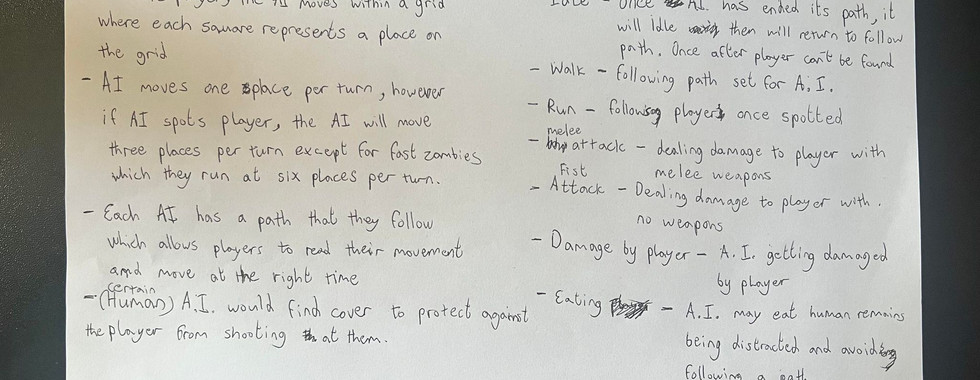
AI Blueprints
I created a few blueprints for the AI to function properly such as:


Gifs
Here are a few gifs demonstrating AI movement and senses working as well as dealing damage to the AI.
Debugging Code
Throughout the 5 weeks of production, I came across bugs in the code of the project that needed to be fixed such as:


Project Overhaul
After receiving feedback from the presentation and looking over the direction of the project. I found it difficult to program through the hard code I had made, so I spent another 4 weeks improving the project's programming.
Programming Practices
I decided to first research best practices using Unreal Engine 5 and found a lot of informational and example videos of how these practices can be useful.

Data and Variable Methods
I started working on ways of using Data and Variables efficiently since it was one of the reasons why the programming so so difficult to change.


Actor Components
I learnt how actor components work and how they can be very useful when wanting to use the same code for multiple actors. Here are examples of actor components composed of functions and variables I developed:


Gifs
Here are a few gifs testing the different actor components and how they can be used for the game.


Animation Blueprint
I found that using blueprint interface functions and enumeration was key to playing specific montages without overuse of the event tick and branch checks. Here are some screenshots to help process what I'm discussing.


Debugging
The extra 4 weeks of programming didn't stop the project from having bugs in the code so here are a few solved by debugging.


Comments